How to Get Started with the Usha Janome Memory Craft 200E
The Usha Janome Memory Craft 200E is an excellent embroidery machine for beginners and professionals alike. It offers a seamless blend of user-friendliness and advanced features, allowing you to bring your creative visions to life. In this guide, we will walk you through the process of setting up and using your Usha Janome Memory Craft 200E to get started with embroidery projects confidently. How to Get Started with the Usha Janome Memory Craft 200E
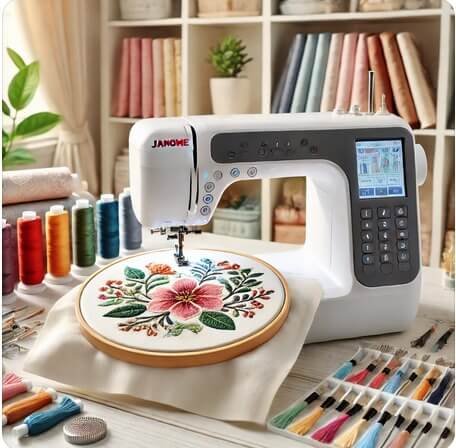
1. Unboxing and Setting Up the Machine
What’s in the Box?
When you unbox your Usha Janome Memory Craft 200E, ensure that the following items are included:
- The Memory Craft 200E machine
- Power cord and foot pedal
- Embroidery hoops
- Bobbins
- Embroidery needle set
- Instruction manual
- Quick start guide
- Software CD (if applicable)
Setting Up
- Choose a Workspace: Place the machine on a sturdy, flat surface with good lighting.
- Plug In and Power On: Connect the power cord and foot pedal to the machine, then switch it on.
- Attach the Embroidery Hoop: Secure the embroidery hoop onto the machine’s embroidery arm as per the instruction manual.
2. Familiarizing Yourself with the Controls
Key Features
- LCD Touchscreen: Navigate through designs, adjust settings, and preview patterns.
- Thread Cutter: Automatic thread cutting for convenience.
- USB Port: Import embroidery designs from a USB drive.
Spend some time exploring the LCD touchscreen menu. You’ll find built-in embroidery patterns, monogramming fonts, and options for editing designs.
3. Threading the Machine
Upper Threading
- Raise the presser foot.
- Follow the threading path indicated on the machine, ensuring the thread is seated properly in each guide.
- Thread the needle manually or use the built-in needle threader.
Bobbin Threading
- Wind the bobbin using the bobbin winder.
- Insert the bobbin into the bobbin case and pull the thread through the guide.
4. Selecting and Preparing Your Embroidery Design
The Usha Janome Memory Craft 200E comes with built-in designs, or you can import your own using a USB drive.
Built-In Designs
- Browse the machine’s library for pre-loaded patterns.
- Select a design and adjust the size, rotation, or placement as needed.
Importing Custom Designs
- Save your design in a compatible format (e.g., .JEF) onto a USB drive.
- Insert the USB into the machine and load your design through the menu.
5. Hooping Your Fabric
Properly hooping your fabric is crucial for accurate embroidery.
Steps:
- Choose the right hoop size for your design.
- Place your fabric and stabilizer (e.g., tear-away or cut-away) inside the hoop.
- Tighten the hoop to ensure the fabric is taut but not stretched.
6. Starting Your First Embroidery Project
- Position the Hoop: Attach the hooped fabric to the embroidery arm.
- Preview the Design: Use the LCD screen to ensure the design is correctly positioned.
- Begin Embroidery: Press the start button and let the machine stitch the design. Pause if needed to change threads for multi-color designs.
7. Tips for Success
Choosing the Right Stabilizer
- Tear-Away Stabilizers: Ideal for stable fabrics like cotton.
- Cut-Away Stabilizers: Best for stretchy or delicate fabrics.
- Water-Soluble Stabilizers: Perfect for creating free-standing lace.
Thread and Needle Selection
- Use high-quality embroidery thread to prevent breakage.
- Match the needle size to your fabric type.
Regular Maintenance
- Clean the bobbin area regularly to remove lint.
- Oil the machine as per the manual to ensure smooth operation.
8. Troubleshooting Common Issues
- Thread Breakage: Check threading paths and ensure the tension is set correctly.
- Skipped Stitches: Use the correct needle type and ensure it is not bent or dull.
- Hoop Slipping: Re-hoop the fabric to maintain tension.
9. Exploring Advanced Features
Once you are comfortable with basic embroidery, explore these features:
- Design Editing: Resize, rotate, and combine designs on the LCD screen.
- Monogramming: Personalize items with initials or names using built-in fonts.
- Pattern Importing: Experiment with custom designs to expand your creative possibilities.
10. Caring for Your Usha Janome Memory Craft 200E
- Cover the Machine: Use a dust cover when not in use.
- Periodic Servicing: Take the machine to an authorized service center for regular maintenance.
- Update Software: Check for firmware updates to enhance performance and add new features.
11. Exploring Embroidery Options on the Usha Janome Memory Craft 200E
The Usha Janome Memory Craft 200E is equipped with a wide range of features and functionalities that make embroidery projects more enjoyable and precise. It’s ideal for both beginners and experienced crafters who want to take their designs to the next level. Let’s explore some options to elevate your embroidery projects.
Monogramming and Lettering
One of the most exciting features of the Usha Janome Memory Craft 200E is the ability to create personalized monograms and letters. The machine comes with a variety of font styles to choose from, allowing you to add customized text to your embroidery projects. Whether you’re stitching initials on towels, names on garments, or any other personalized detail, the easy-to-use fonts and templates make it a breeze.
Built-In Patterns and Designs
If you’re not in the mood to create your own designs from scratch, the Usha Janome Memory Craft 200E comes pre-loaded with a vast library of patterns and embroidery designs. From floral patterns to geometric shapes, you’ll find a variety of styles to suit any occasion. With the LCD touchscreen, you can select, edit, and arrange designs quickly, ensuring your embroidery projects come out exactly as you envision.
Customizing Embroidery Designs
The Usha Janome Memory Craft 200E allows you to modify the built-in embroidery designs by resizing, rotating, and repositioning them directly on the screen. This feature is invaluable for creating unique designs. For example, if a particular design needs to fit within a specific space, you can resize it without compromising on quality.
12. Importing and Working with Custom Designs
If you’re looking to use your own embroidery designs, the Usha Janome Memory Craft 200E gives you the flexibility to import them from a USB drive. This opens up endless possibilities, especially if you’re using third-party software or downloading designs online.
How to Import Designs:
- Save your design: Save your embroidery designs in a compatible format (such as .JEF) to a USB drive.
- Insert the USB Drive: Plug the USB drive into the machine’s USB port.
- Access the Design: Navigate through the LCD touchscreen menu to access your design and load it into the machine.
- Edit and Position: Once the design is imported, you can resize, rotate, and adjust the position using the on-screen controls to fit your fabric.
Creating Multi-Color Designs
The machine makes multi-color embroidery easy to manage. You can manually change threads as needed for designs with different colors. The machine will pause automatically at the end of each color block, making it simple to follow along and ensure the design comes out perfectly.
Conclusion
The Usha Janome Memory Craft 200E is a powerful yet user-friendly embroidery machine designed to cater to beginners and experienced users alike. By following this step-by-step guide, you’ll be able to set up, operate, and maintain your machine effectively. Dive into the world of embroidery and unleash your creativity with ease!

